My
1987 Porsche 928 S4, 5 speed
Clutch
Replacement
To Dot It Or Not To Do
It?
Since
clutch
replacement jobs varied between $1500 - $1800 as estimated in So Cal,
and that excludes hydraulic control replacement, I have asked Mark
Anderson
for his advice.
"Do it Yourself" he said. And when I read Jim Baileys
assessment that clutch replacement on 928 is "easiest job known to
man",
I was pumped up. Even Jay Kemp assessment that ..."unless
you are insane DO NOT replace Master Cylinder yourself", did not
discourage
me. Friend of mine, Mark Ralston was kind enough to let me
assist Him through the entire clutch job.
Well not all was as simple as I thought.
Pilot Bearing Pull-out
Tool
Anticipating pilot bearing difficulties, Mark
arrived at the pilot
bearing tool that that worked very well.
What Is Replaced:
- Clutch Kit, that includes:
- Pressure Plate,
- Disc, and
- Release Bearing (upgraded design for reduced chatter,
compatible only with the new fork and new guide tube),
- Pilot Bearing,
- Fork (required with new release bearing),
- Guide Tube (required with new release bearing),
- Master Cylinder and blue hose,
- Slave Cylinder,
- Housing bushing for fork pivot ball, and
- Exhaust line flange gaskets.
Why fork, tube and
bearing must be replaced jointly:
- For 1987 models and later, Fork, guide tube and release bearing
are required
via TSBs to be replaced jointly.
Just At The Beginning:
Lesson Learned: Use spacers as set forth in the Shop
Manual!
- We tried to drop the clutch, after following Shop Manual
instruction, short of one: we did NOT put the spacers since there
was no gap:
.
We thought that NO
gap meant no spacers are needed - wrong!
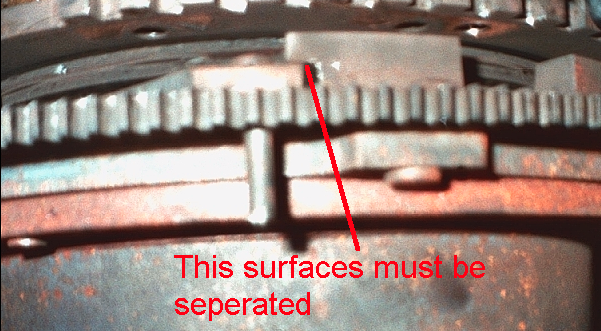
- There was no way clutch could be dropped, to the point that we
jammed is so well that it could not be rotated. The TDC pins,
even though not needed in S4, are causing rubbing against the housing
(see picture below, pins above the fork).
- So we went ot the RENNLIST and we got superb reply. All
advice were very helpful and told us DO follow the correct procedure -
it is there for a reason.
- Thanks to all who provided great help - see here Q
& A on this and issues we run into.
- We had to use crowbar to lift the fork and create enough gap to
insert the rivet (I am not sure the size but it met 2mm thickness
requirement set forth in the Shop Manual),
- It takes a lot of force so have spacers ready when gap is
created (this was job for two in our case, but it probably could be
done by one person with very strong arms - notice the size of the
crowbar we had to use to get job done!).
 Mark is getting
ready to make that gap
Mark is getting
ready to make that gap.
Mark was not too
happy to hold the crowbar under heavy load so I could take this picture.
- With the spacers in place all followed normally and clutch was
out in no time. Follow the procedure and You life will be easier!
- Removed Pressure Plate shows three rivets we
used. The same will have to done for installation of
new clutch assembly.
Master Cylinder Replacement
- This is task for two and it does NOT require cutting a hole in
the frame to access Master Cylinder bolts, if one is patient (30
minutes of trying to align the bolt with the nut).
- One can access Master Cylinder bolts, fed from inside the car
though the firewall and Master Cylinder flange, without removing
anything from the engine compartment.,
- <>We used longer rod to first align one hole in the
Master
Cylinder flange with the firewall hole,
- Then we fed thought the bolt from inside and applied the nut from
engine compartment side,
- The hardest part was to align the bolt with the nut for threats
to engage and here is 15-20 min per bolt.
- <>After number ot tries, the connection will be made
between the
bolt and the nut.
System Filling
- After connecting all lines we used Power Bleeder ($40 at Big
Three),
- Once pressurized, drain plug in the Slave Cylinder was open and
the system was purged completely the first time,
- We used ATE Supper Blue,
- Entire operation took no more that 10 minutes, and
- More that 5K miles later clutch works great with no air bubbles
in the system.
HOME